strongSwan 基于vti设备的 Route-based 虚拟专用网实验
本文介绍一个strongSwan 基于vti设备的 Route-based 虚拟专用网实验
strongSwan默认是使用基于策略(Policies)的IPsec 虚拟专用网,对于IPsec流量/明文流量没有区分不同的接口(Interface),这种模式在设置防火墙策略时存在很多麻烦,必须使用很多高级的Matcher,区分出IPsec流量/明文流量。(至少我在firewalld上没有找到很好的办法,也许可以使用direct rules来实现,但据称direct rules已经过时了,今后可能去掉。)为了更方便的使用防火墙(特别是firewalld),设计了以下strongSwan 基于vti设备的 Route-based 虚拟专用网实验。
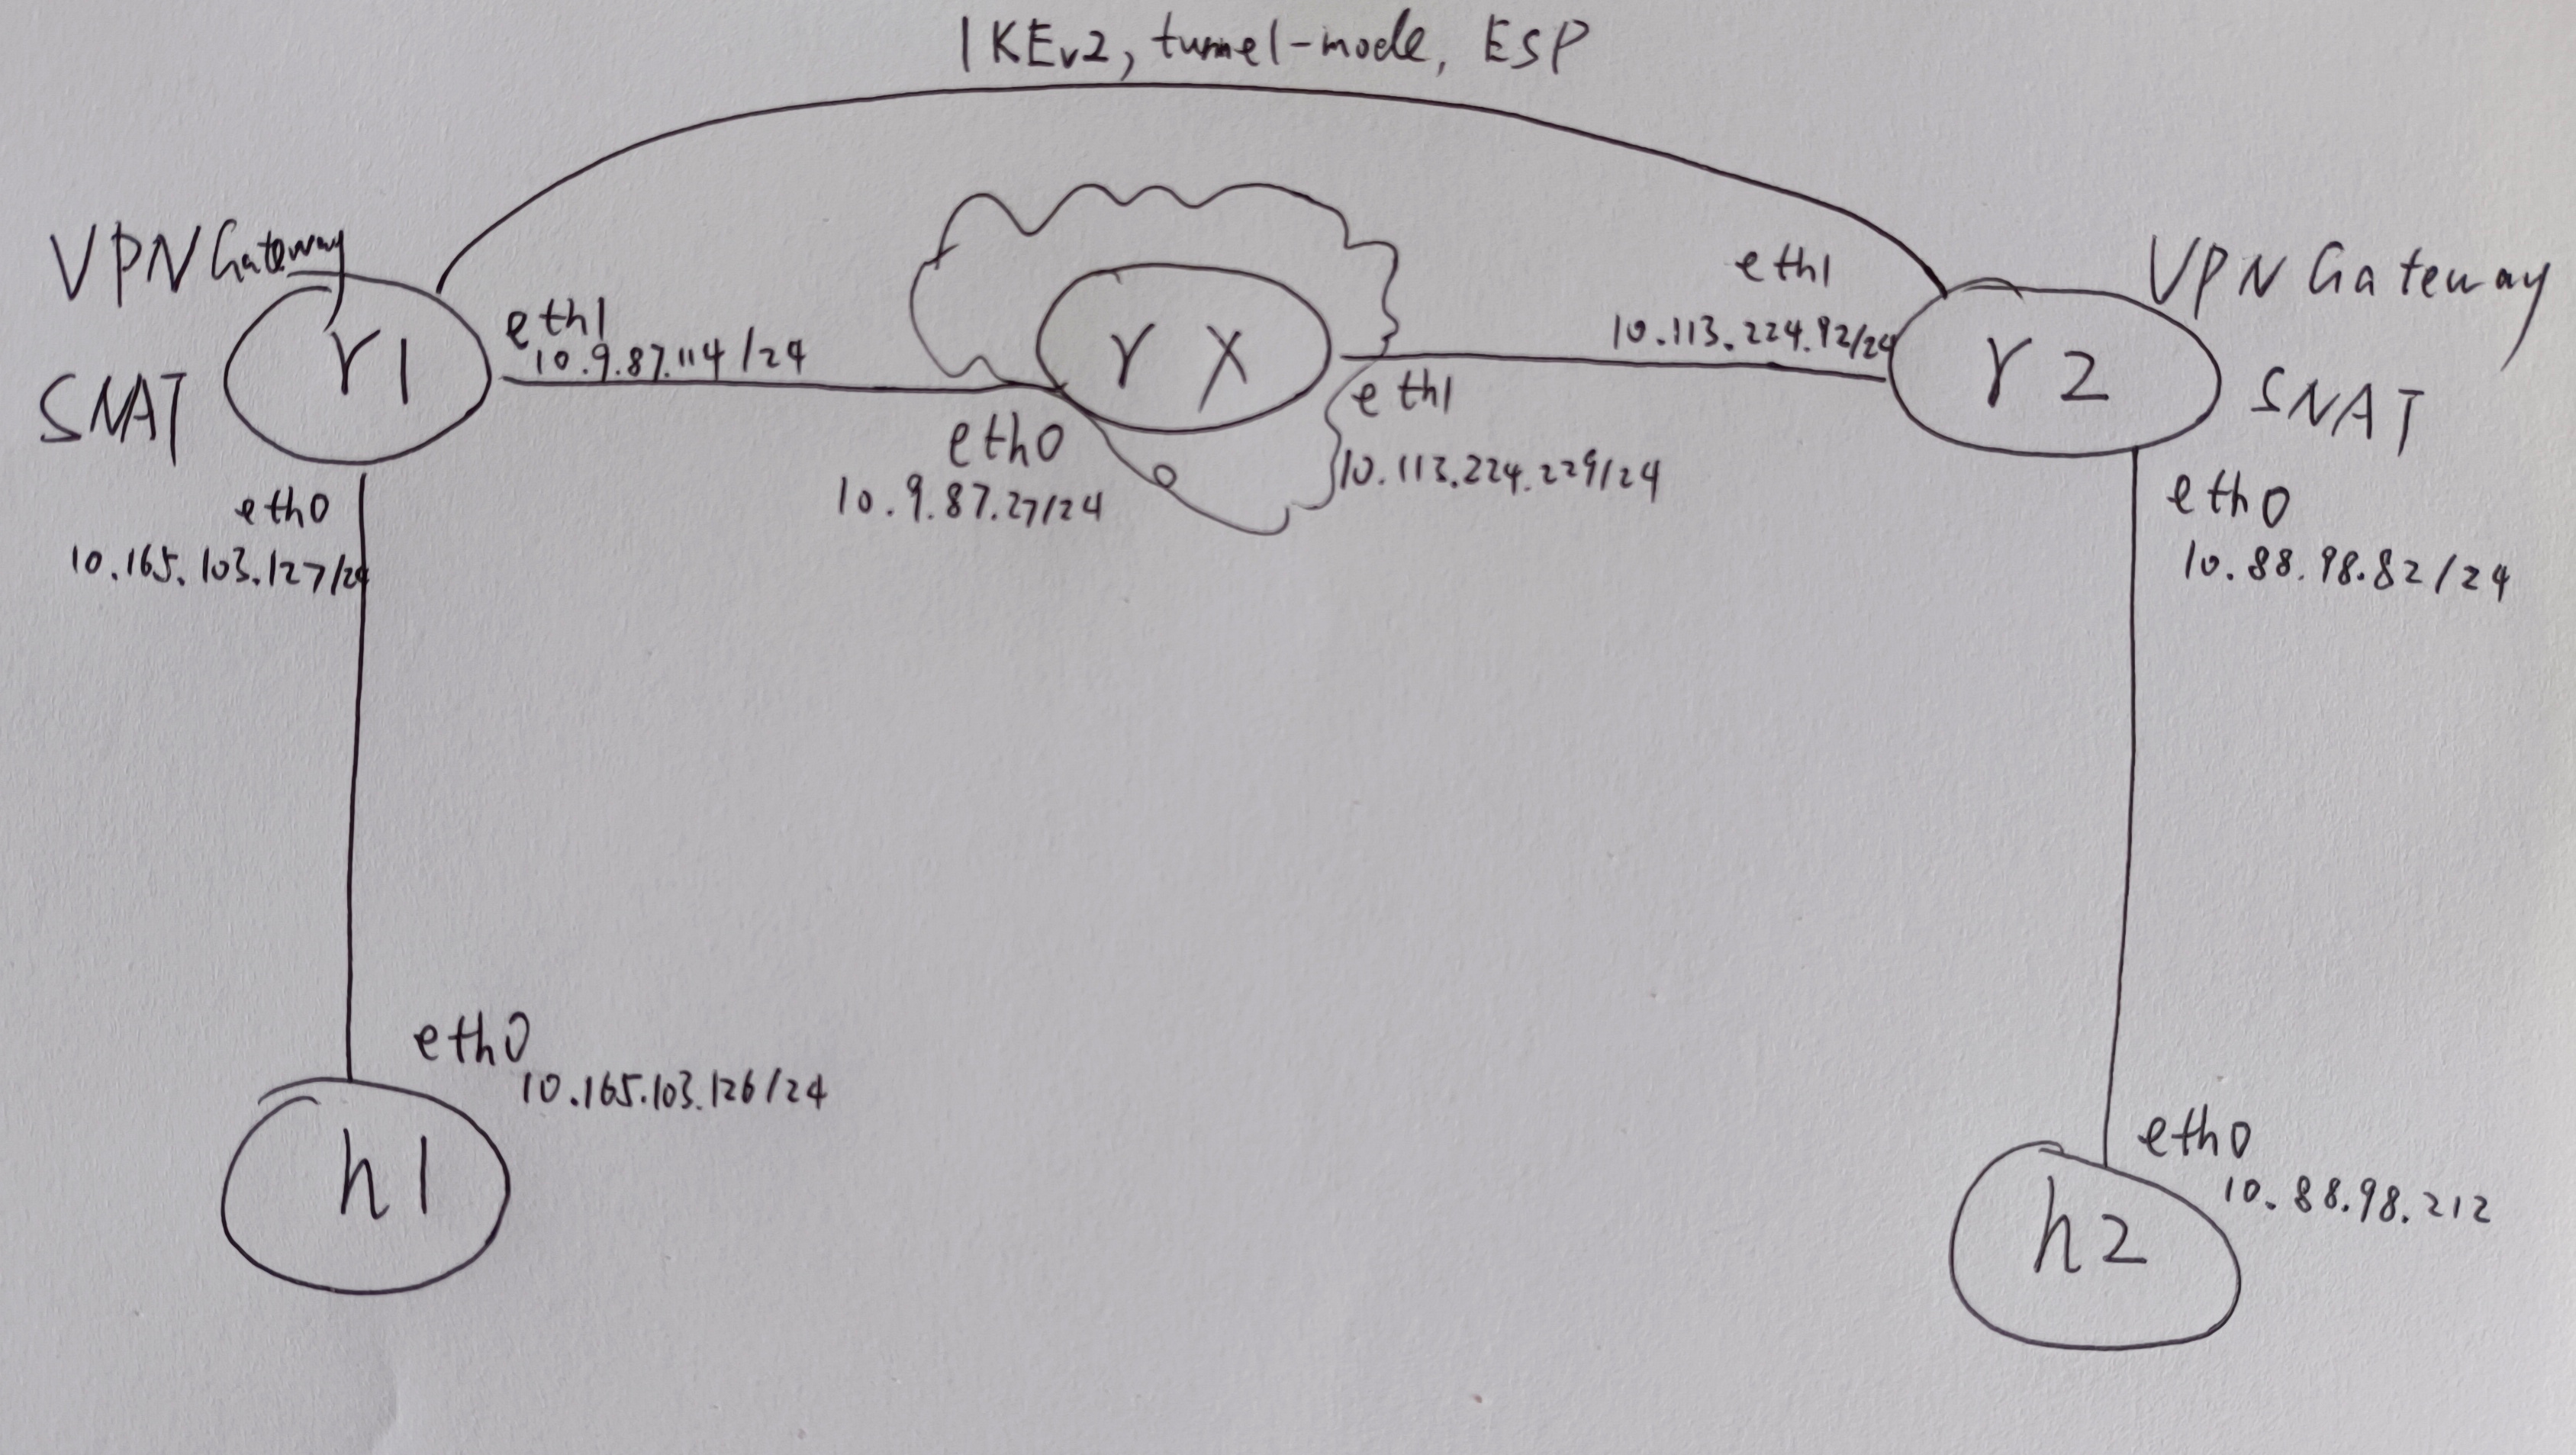
准备
首先按图施工,搭建一个传统的基于Policies的IPsec可联通环境。
lxc list
+------+---------+-----------------------+-----------------------------------------------+-----------+-----------+
| NAME |  STATE  |         IPV4          |                     IPV6                      |   TYPE    | SNAPSHOTS |
+------+---------+-----------------------+-----------------------------------------------+-----------+-----------+
| h1   | RUNNING | 10.165.103.126 (eth0) | fd42:a497:a975:8f4d:216:3eff:fecb:fc37 (eth0) | CONTAINER | 0         |
+------+---------+-----------------------+-----------------------------------------------+-----------+-----------+
| h2   | RUNNING | 10.88.98.212 (eth0)   | fd42:2443:280b:3d9a:216:3eff:fecf:2510 (eth0) | CONTAINER | 0         |
+------+---------+-----------------------+-----------------------------------------------+-----------+-----------+
| r1   | RUNNING | 10.9.87.114 (eth1)    | fd42:a497:a975:8f4d:216:3eff:fe06:7844 (eth0) | CONTAINER | 0         |
|      |         | 10.165.103.127 (eth0) | fd42:9ec5:6315:437a:216:3eff:fe96:5bfc (eth1) |           |           |
+------+---------+-----------------------+-----------------------------------------------+-----------+-----------+
| r2   | RUNNING | 10.88.98.82 (eth0)    | fd42:cb1f:d526:a477:216:3eff:fe3d:2241 (eth1) | CONTAINER | 0         |
|      |         | 10.113.224.92 (eth1)  | fd42:2443:280b:3d9a:216:3eff:fe24:5117 (eth0) |           |           |
+------+---------+-----------------------+-----------------------------------------------+-----------+-----------+
| rx   | RUNNING | 10.9.87.27 (eth0)     | fd42:cb1f:d526:a477:216:3eff:fe76:9c63 (eth1) | CONTAINER | 0         |
|      |         | 10.113.224.229 (eth1) | fd42:9ec5:6315:437a:216:3eff:fee6:1b44 (eth0) |           |           |
+------+---------+-----------------------+-----------------------------------------------+-----------+-----------+
lxc network list
+--------+----------+---------+-----------------+---------------------------+-------------+---------+---------+
|  NAME  |   TYPE   | MANAGED |      IPV4       |           IPV6            | DESCRIPTION | USED BY |  STATE  |
+--------+----------+---------+-----------------+---------------------------+-------------+---------+---------+
| eth0   | physical | NO      |                 |                           |             | 0       |         |
+--------+----------+---------+-----------------+---------------------------+-------------+---------+---------+
| lxdbr0 | bridge   | YES     | 10.165.103.1/24 | fd42:a497:a975:8f4d::1/64 |             | 3       | CREATED |
+--------+----------+---------+-----------------+---------------------------+-------------+---------+---------+
| lxdbr1 | bridge   | YES     | 10.9.87.1/24    | fd42:9ec5:6315:437a::1/64 |             | 2       | CREATED |
+--------+----------+---------+-----------------+---------------------------+-------------+---------+---------+
| lxdbr2 | bridge   | YES     | 10.113.224.1/24 | fd42:cb1f:d526:a477::1/64 |             | 2       | CREATED |
+--------+----------+---------+-----------------+---------------------------+-------------+---------+---------+
| lxdbr3 | bridge   | YES     | 10.88.98.1/24   | fd42:2443:280b:3d9a::1/64 |             | 2       | CREATED |
+--------+----------+---------+-----------------+---------------------------+-------------+---------+---------+
lxd的相关命令此处略。
h1
/etc/systemd/network/eth0.network
[Match]
Name=eth0

[Network]
DHCP=ipv4

[Route]
Gateway=10.165.103.127
Metric=1024

[DHCPv4]
UseRoutes=false
[DHCPv4]章节UseRoutes=false的目的是禁止通过DHCP获取到默认网关,因为我们要手工指定网关。
r1
/etc/systemd/network/eth0.network
[Match]
Name=eth0

[Network]
DHCP=ipv4

[DHCPv4]
UseRoutes=false
/etc/systemd/network/eth1.network
[Match]
Name=eth1

[Network]
DHCP=ipv4

[DHCPv4]
UseRoutes=false
/etc/systemd/system/iptables.service
[Service]
Type=oneshot
RemainAfterExit=yes
ExecStart=iptables -t nat -A POSTROUTING -s 10.165.103.0/24 -o eth1 -m policy --dir out --pol ipsec -j ACCEPT
ExecStart=iptables -t nat -A POSTROUTING -s 10.165.103.0/24 -o eth1 -j MASQUERADE

[Install]
WantedBy=multi-user.target

[Unit]
Wants=network-online.target
After=network-online.target
启用iptables.service是可选的。
/etc/bird.conf
log syslog all;

protocol device {
}

protocol direct {
    disabled;		# Disable by default
    ipv4;			# Connect to default IPv4 table
    ipv6;			# ... and to default IPv6 table
}

protocol kernel {
    ipv4 {			# Connect protocol to IPv4 table by channel
          export all;	# Export to protocol. default is export none
    };
}

protocol kernel {
    ipv6 { export all; };
}

protocol static {
    ipv4;			# Again, IPv4 channel with default options

}

protocol ospf v2 {
    area 0 {
        interface "eth1" {
	        type broadcast;		# Detected by default
	        cost 10;		# Interface metric
	        hello 5;		# Default hello perid 10 is too long
        };
    };
}
注意此处ospf只发布eth1接口的路由。
/etc/hosts
10.9.87.114 arch1.strongswan.org
10.113.224.92 arch2.strongswan.org
/etc/swanctl/swanctl.conf
include conf.d/*.conf

  connections {
    net-net {
      remote_addrs = arch2.strongswan.org
      local {
        auth = pubkey
        certs = arch1Cert.pem
      }
      remote {
        auth = pubkey
      }
      children {
        net-net {
          local_ts  = 10.165.103.0/24
          remote_ts = 10.88.98.0/24
          start_action = trap
        }
      }
    }
  }
PKI 基础设施的产生此处略。
rx
/etc/systemd/network/eth0.network
[Match]
Name=eth0

[Network]
DHCP=ipv4

[DHCPv4]
UseRoutes=false
/etc/systemd/network/eth1.network
[Match]
Name=eth1

[Network]
DHCP=ipv4

[DHCPv4]
UseRoutes=false
/etc/bird.conf
log syslog all;

protocol device {
}

protocol direct {
    disabled;		# Disable by default
    ipv4;			# Connect to default IPv4 table
    ipv6;			# ... and to default IPv6 table
}

protocol kernel {
    ipv4 {			# Connect protocol to IPv4 table by channel
          export all;	# Export to protocol. default is export none
    };
}

protocol kernel {
    ipv6 { export all; };
}

protocol static {
    ipv4;			# Again, IPv4 channel with default options

}

protocol ospf v2 {
    area 0 {
        interface "eth*" {
	        type broadcast;		# Detected by default
	        cost 10;		# Interface metric
	        hello 5;		# Default hello perid 10 is too long
        };
    };
}
注意此处ospf发布eth0、eth2的路由,rx只当一个普通的路由器用。
r2
/etc/systemd/network/eth0.network
[Match]
Name=eth0

[Network]
DHCP=ipv4

[DHCPv4]
UseRoutes=false
/etc/systemd/network/eth1.network
[Match]
Name=eth1

[Network]
DHCP=ipv4

[DHCPv4]
UseRoutes=false
/etc/systemd/system/iptables.service
[Service]
Type=oneshot
RemainAfterExit=yes
ExecStart=iptables -t nat -A POSTROUTING -s 10.88.98.0/24 -o eth1 -m policy --dir out --pol ipsec -j ACCEPT
ExecStart=iptables -t nat -A POSTROUTING -s 10.88.98.0/24 -o eth1 -j MASQUERADE

[Install]
WantedBy=multi-user.target

[Unit]
Wants=network-online.target
After=network-online.target
/etc/bird.conf
log syslog all;

protocol device {
}

protocol direct {
    disabled;		# Disable by default
    ipv4;			# Connect to default IPv4 table
    ipv6;			# ... and to default IPv6 table
}

protocol kernel {
    ipv4 {			# Connect protocol to IPv4 table by channel
          export all;	# Export to protocol. default is export none
    };
}

protocol kernel {
    ipv6 { export all; };
}

protocol static {
    ipv4;			# Again, IPv4 channel with default options

}

protocol ospf v2 {
    area 0 {
        interface "eth1" {
	        type broadcast;		# Detected by default
	        cost 10;		# Interface metric
	        hello 5;		# Default hello perid 10 is too long
        };
    };
}
注意此处ospf只发布eth1接口的路由。
/etc/hosts
10.9.87.114 arch1.strongswan.org
10.113.224.92 arch2.strongswan.org
/etc/swanctl/swanctl.conf
include conf.d/*.conf

  connections {
    net-net {
      remote_addrs = arch1.strongswan.org
      local {
        auth = pubkey
        certs = arch2Cert.pem
      }
      remote {
        auth = pubkey
        id = "C=CH, O=strongSwan, CN=arch1.strongswan.org"
      }
      children {
        net-net {
          local_ts  = 10.88.98.0/24
          remote_ts = 10.165.103.0/24
          start_action = trap
        }
      }
    }
  }
h2
/etc/systemd/network/eth0.network
[Match]
Name=eth0

[Network]
DHCP=ipv4

[Route]
Gateway=10.88.98.82
Metric=1024

[DHCPv4]
UseRoutes=false
测试从h1上能ping通h2,环境搭建完成,接下来将其改造为一个基于vti设备的Route-based虚拟专用网。
实验
r1
首先执行 以下 testvti.sh
ip tunnel del ipsec0
ip link add name ipsec0 type vti key 42 local 10.9.87.114 remote 10.113.224.92
ip link set ipsec0 up
ip route add 10.88.98.0/24 dev ipsec0
sysctl -w net.ipv4.conf.ipsec0.disable_policy=1
然后更改/etc/strongswan.d/charon.conf中install_routes = yes为install_routes = yes
然后更改/etc/strongswan.d/charon/forecast.conf中load = yes为load = no
然后更改/etc/swanctl/swanctl.conf为
include conf.d/*.conf

  connections {
    net-net {
      remote_addrs = arch2.strongswan.org
      local {
        auth = pubkey
        certs = arch1Cert.pem
      }
      remote {
        auth = pubkey
      }
      children {
        net-net {
          local_ts  = 0.0.0.0/0
          remote_ts = 0.0.0.0/0
          mark_in = 42
          mark_out = 42
          start_action = trap
        }
      }
    }
  }
测试从h1上能ping通h2,实验成功。
由于基于vti的Route-based虚拟专用网,不像基于GRE的虚拟专用网一样,必须两端同时启用。此处r2的设置略。但两端同时启用,应该也能成功。
结论
- 更改
/etc/strongswan.d/charon/forecast.conf中load = yes为load = no非常重要,经测试,不更改这个参数当r1的eth1和r2的eth2在同一网段时能成功,不在同一网段则无法成功。可能跟forcast插件动了netfilters中的mark有关,和vti中的mark冲突了。 - 经测试
/etc/strongswan.d/charon/bypass-lan.conf可以加载,r1的eth1和r2的eth2在不在同一网段则无法成功问题,与bypass-lan插件无关。 - 基于xfrm interface_id的防火墙,由于不与mark冲突,也许是更好的选择
- r1和r2进行SNAT的目的是模拟公网IPv4上网的实际场景,不进行SNAT实验也可以成功。 实验中使用OSPF打通了r1、rx、r2方便路由管理,r1、r2没有通过OSPF发布eth0网段路由是有意为之,也符合实际场景。
参考
- https://docs.strongswan.org/docs/5.9/features/routeBasedVpn.html#_vti_devices_on_linux 官方文档
- https://thermalcircle.de/doku.php?id=blog:linux:nftables_demystifying_ipsec_expressions 设计实验的灵感来源
- https://github.com/strongswan/strongswan/discussions/1720 在这里发现必须禁用forcast插件
- https://blog.csdn.net/sinat_20184565/article/details/103189610 vti接口也可以封装ipv6报文吗?未验证
下一步
- 进行Strongswan 基于xfrm interface_id的实验
- 实验启用firewalld防火墙,研究Route-based 虚拟专用网的原因就是想更方便的启用防火墙
- 有时间的话深入研究下启用forcast插件不成功的原因,可以深入学习netfilters实现IPsec的机制